David Mearns – Search Director, The Finding Sydney Foundation
Whilst it has taken longer than expected I am very pleased we can now show the first pictures of HMAS Sydney to a waiting Australia. At 15:10 (AWT) on Thursday 03 March 2008, our cameras focused on the first sections of Sydney seen for over 66 years. We landed directly across “X” turret on the port side, where we intended, and it was immediately clear that Sydney was upright as I had felt from the side-scan sonar images. The twin guns of “X” turret were pointed to port, as were virtually all the guns we could see viewing the wreck from the port side.
Because we landed nearer to the stern we begin moving slowly in that direction to see if we could locate Sydney’s bell on the quarterdeck (sadly it was nowhere to be found) or possibly her name on the stern in case we were mistaken and her brass lettering hadn’t been removed as part of her wartime preparations. But there was no mistaking that the wreck before us was that of HMAS Sydney and that her damage matched perfectly to what we expected from the side-scan sonar imagery and from the German accounts of the battle.
Based on the characteristic impact damage I have seen with many deepwater shipwrecks I believe that Sydney hit the seabed stern first and slid 50 metres or so to her final resting place - dislocating at least one of her propellers shafts in the process. Both funnels and masts were gone and all the lifeboats were missing from their cradle stands, but all four turrets were retained in place. As per the German accounts the bridge and superstructure of Sydney withstood the worst damage as the heavy guns of Kormoran clearly had a devastating effect. The bow was gone just forward of “A” turret in keeping with the torpedo strike in this location.
After we traversed the entire length of the port side of Sydney we suspended our dive to immediately write up this blog and get these pictures out to everyone who have been waiting so patiently whilst we dealt with a myriad of technical problems and a prolonged period of bad weather. I don’t want to dwell too much on what we have gone through over the past fortnight getting ready for this phase of the project, other than to say that everyone on board the Geosounder have worked incredibly hard against enormous pressure and with impossible weather conditions to finally deliver these first pictures.
With this important first step – positively identifying the wreck of Sydney – of this phase out of the way we have much more work to do in a very limited period of time and with an uncertain weather window. We are still operating somewhat hamstrung by the fact that we are unable to use the ROV in its normal free flying mode as a technical fault has restricted it within its protective garage. Nevertheless, the underwater visibility is superb and we intend to collect as much video and photographic imagery as we possibly can after the ROV is recovered and repaired.
Glenys McDonald - Director, The Finding Sydney Foundation (Observer)
I have waited nearly 20 years for today. Right from the start everything we have all worked for appeared to be finally coming together. After days of big swells the seas had calmed, the ROV technicians were smiling, and we looked good to go: we were going to get our dive.
The atmosphere in the survey room, two decks below was filled with anticipation as we watched the ROV slowly descend nearly 2450 metres. Nigel the navigator patted me on the shoulder and said we were going to be right on target, I felt so nervous. All we could see was a blue screen with a bright light and the occasional fish. Then there was a shadow, and almost immediately HMAS Sydney appeared in front of us. It is impossible to convey to you the depth of feeling in that room as we watched in awe as the stern of Sydney and her “X” turret came into view.
The ROV operators did an incredible job panning in and along the port side of our mighty ship and around the broken bow. So much was recognisable as we compared what we were seeing with our plans and photographs. I cried as usual, I could not help it, because I could anticipate what these photographs were going to mean for so many of the relatives of the crew that I had come to know and love over the years. The crew of the Geosounder shared the moment with us, we had all worked towards this outcome. To my fellow Directors on shore, bravo zulu.
John Perryman – Senior Naval Historian (Observer)
At 15:10, 3 April 2008 the unmistakable image of a Mark XXI 6-inch gun turret came into view on our video monitor in the SV Geosounder’s remotely operated submersible vehicle (ROV) control room.
Operating at a depth almost 2.5 kilometers below us, the ROV had been carefully lowered to the sea floor before slowly creeping up on the wreck of HMAS Sydney (II). We did not have long to wait before we received the final proof necessary to eliminate any doubt whatsoever that this was her. The ROV illuminated the wreck adjacent to X and Y gun turrets which lay mute with their guns still trained to port, pointing forward at an angle of approximately 45 degrees. The top of “Y” turret was covered in some wreckage and there was evidence of a large split in the deck immediately next to it.
As the ROV was maneuvered aft along the main deck, one of Sydney’s propellers came into view on the sea bed as did the stern and ensign staff which lay across its teak decking.
The ROV was then steered forward along the port side so a full inspection of the length of Sydney could be made. As the height of the ROV was adjusted, the aft end of the senior officer’s accommodation came into view and we began to see more signs of damage. The aft searchlight platform and mainmast were both gone, as was the 0.5 inch quad mounting and aft funnel. Both 4-inch high angle guns on the port side gun deck were in place and trained to port but there was no sign at all of the quadruple 21-inch torpedo tubes, only the disc and ring gear that they were once mounted on remained.
As we continued forward we located the circular mounting for the aircraft catapult and the remains of the aircraft crane. At the same time we observed several large shell holes in Sydney’s port side above the water line. No evidence of any of Sydney’s boats remained and there was only a gapping hole where her forward funnel had once stood. The foremast too, had been carried away.
Soon the bridge and superstructure came into view and it was immediately obvious that this part of the ship had been subjected to severe punishment. The Mark II quadruple 0.5 inch gun platform had partially collapsed, both the Director Control Tower and High Angle Control Station behind the compass platform were gone and the bridge was completely devastated. The starboard side 12 foot UK-1 range finder was one of only a handful of readily identifiable features in this area.
Continuing forward we came across “B” and “A” gun turrets, both of which were still trained to port. Part of the top of B turret was completely missing and there was a neat round hole punched through it between the two gun barrels where it had received a direct hit. “A” turret’s housing was also very badly damaged with little of it remaining. It was at this point that the wreck of HMAS Sydney ended, with her bow completely missing from immediately forward of “A” turret. The damage in this area showed signs of what may have been a violent explosion as the deck had been rent upwards and folded up over the gun barrels of “A” turret. The ship’s side of Sydney in this area had been peeled back too and this could have been the result of the Kormoran’s torpedo hit on her.
At this point the inspection was suspended to allow time to record our observations for a waiting world. Although in a badly damaged state, this great warship retains a powerful aura, in her final resting place off the Western Australian coast.
Dr. Michael (Mac) McCarthy – Curator of Maritime Archaeology, WA Museum (Observer)
Given the images I had seen of other deepwater warship wrecks, the port side of HMAS Sydney, down which we traversed from 1510H when the stern first appeared out of the gloom, has retained far more of its superstructure than I had expected. Thanks to the detailed builder’s plans obtained by Lieutenant John Perryman RANR, those foldouts appearing in Wes Olson’s book and a few tracings I had made of them, we were able to follow progress along the wreck quite well. Occasionally we (I) got lost, but pretty soon we were back on track able to identify fittings and fixtures, features, lines of scuttles and so on. In this we were fortunate to have the crew of the Geosounder who crowded into the survey room behind us, quickly proving adept at ensuring items familiar to them in their everyday work were quickly recognised, identified and located to plan.
While the funnels of HMAS Sydney are gone as expected, either as a result of the battle or the long slide into the depths, all the large guns remain and the teak deck is visible in places. The seaplane recovery crane is there, albeit a tangled wreck and boat cradles are in place. The border between differing shades in the camouflage painting is clearly evident in some parts as is the boot topping (thick painted strip) along the waterline. Concretions, as expected, are non-existent leaving the hull looking very much as it would in its final hours afloat.


Above Photograph: Port side cradle for aft 27 foot whale boat (missing).
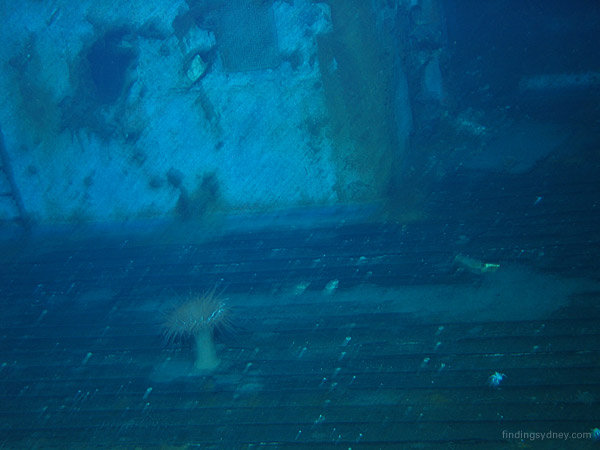
Above Photograph: Areas of Sydney’s teak decking remain remarkably intact.

Above Photograph: Midships kedge anchor.
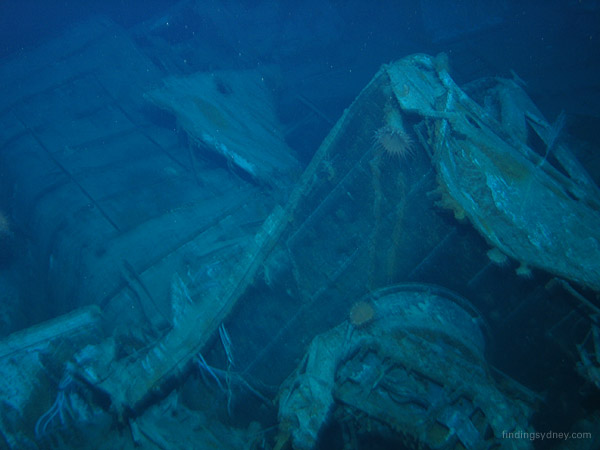
Above Photograph: Upturned searchlight platform torn away from forward funnel.
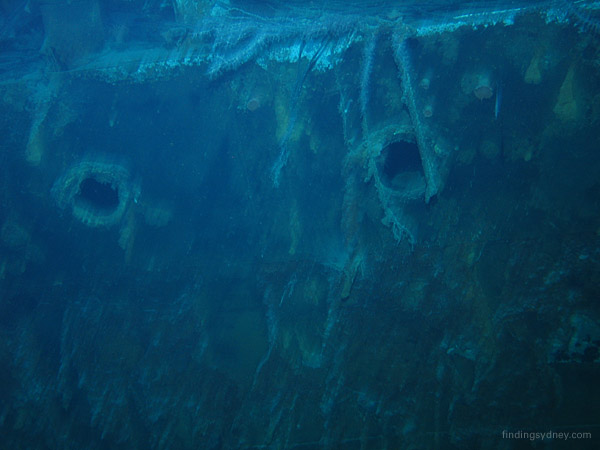
Above Photograph: Some of the many portholes visible on Sydney’s port side.

Above Photograph: “B” turret showing evidence of a direct hit between gun barrels and damage to turret roof.

Above Photograph: Wreckage strewn on top of “Y” turret.
Photo Gallery Slideshow available at http://www.findingsydney.com/gallery.asp
IMPORTANT NOTICE: The Material (including photographs) available in the "Press Room" section of this Website may be used/reproduced unaltered by your organisation (unless stated otherwise within the content description) subject to the terms and conditions set out in the Legal Section AND any Material (including photographs) which you use/reproduce must credit the source as "The Finding Sydney Foundation" and, as an option, you may also link the source statement with the website address http://www.findingsydney.com/.
Photographer: David Mearns